


Hello there! I’m Allen, and for years, my factory here in China has been at the forefront of producing Self-Drilling Anchor Systems and Drilling Tools. We’ve proudly supplied high-quality components to construction companies, mining operations, and geotechnical firms across the USA, North America, Europe, and Australia. Today, I want to share some of that foundational knowledge with you, specifically about a small but mighty component: the wall anchor. Whether you’re hanging a heavy mirror, installing a new shelf, or securing furniture to a wall, understanding the humble wall anchor, especially for drywall or hollow wall applications, is crucial. This guide will walk you through the different type of anchor options, explain how they work, and help you choose the perfect anchor for your needs, ensuring your installations are safe, secure, and long-lasting. For professionals like Mark Davis, a company owner and procurement officer who values quality and competitive pricing, getting the right fastener is key to project success and client satisfaction. This article aims to demystify the wall anchor, making it easier for everyone, from DIY enthusiasts to seasoned contractors, to make informed decisions.
What Exactly is a Wall Anchor and Why is it Crucial for Drywall?
A wall anchor is a type of fastener designed to create a secure mounting point in materials that are too brittle or too thin to support the weight of a screw on their own. Think of materials like drywall, plaster, or hollow-core doors. If you try to drive a screw directly into drywall without hitting a stud (the wooden or metal supports behind the wall), the screw will likely pull out under even a light load, leaving an unsightly hole. This is because drywall itself doesn’t have much holding power.
This is where the wall anchor comes into play. It’s a true lifesaver! The anchor is inserted into a hole (often a pre-drilling is required, though some are self-drilling) in the drywall. When a screw is then driven into the anchor, the anchor expands or deploys behind the wall material. This expansion creates a much larger surface area that distributes the load more effectively, providing a significantly stronger and more reliable fastening point. Using the correct type of anchor is essential for the safety and longevity of whatever you’re hanging, from pictures and mirrors to shelves and cabinets. Without a proper anchor, you risk damage to your wall and the item you’re trying to secure.
As a manufacturer, we see the direct impact of using appropriate anchor systems. A well-chosen drywall anchor means a secure installation and a happy customer. It’s a small component, but its role is massive in ensuring structural integrity for mounted items in modern construction where drywall is ubiquitous. The peace of mind that comes from knowing your fixtures are securely attached is invaluable.
Understanding the Mechanics: How Do Different Wall Anchor Types Work?
The magic of a wall anchor lies in its ability to create a secure point in a hollow or brittle material. While there are many variations, most wall anchor types operate on a few core principles: expansion, toggling, or self-threading into the base material. Understanding these mechanics helps in selecting the most suitable anchor for your specific application on a drywall wall.
Expansion anchors are perhaps the most common type of anchor. These are often made of plastic or soft metal. When you insert the anchor into a pre-drilling hole and then drive a screw into it, the anchor‘s body splits or expands. This outward pressure presses the anchor firmly against the sides of the hole and, in some designs, flares out behind the drywall. This creates a tight grip and provides good holding power for light to medium loads. The effectiveness of an expansion anchor depends on the snugness of the fit in the hole and the integrity of the wall material.
Toggle anchors, including the well-known toggle bolt, work on a different principle. These anchors feature wing-like appendages that are spring-loaded or gravity-operated. You drill a hole large enough for the collapsed wing mechanism to pass through. Once inside the hollow wall cavity, the wings open up. As you tighten the screw or bolt, the wings are pulled flush against the back of the drywall, distributing the load over a much wider area. This makes toggle anchors ideal for hanging heavy items on hollow wall surfaces. The larger the wing, generally, the greater the load capacity. We also produce specialized components like robust Nuts that are critical for the performance of such bolt-based systems.
Navigating the Options: What are the Main Categories of Drywall Anchors?
When you walk into a hardware store or browse an online supply, the sheer variety of drywall anchor options can be overwhelming. However, they generally fall into a few key categories, each suited for different needs and wall conditions. Knowing these categories will help you narrow down your choices and select the most effective anchor for your task.
Here’s a quick comparison of common drywall anchor categories:
| Anchor Type | Material(s) | Typical Use | Load Capacity | Pre-drilling Required? | Key Feature |
|---|---|---|---|---|---|
| Plastic Expansion | Plastic | Light-duty (pictures) | Low-Medium | Yes | Expands as screw is inserted |
| Ribbed Plastic Anchor | Plastic | Light-duty | Low-Medium | Yes | Ribs provide extra grip |
| Sleeve Type (Molly) | Metal | Medium-duty (shelves) | Medium-High | Yes | Sleeve expands behind wall |
| Self-Drilling | Metal, Nylon | Light-Medium | Medium | No | Drills its own hole |
| Toggle Bolt | Metal | Heavy-duty (cabinets) | High | Yes | Wing flips open behind wall |
| Snap Toggle | Metal, Plastic | Medium-Heavy | Medium-High | Yes | Ratcheting strap and toggle mechanism |
Plastic expansion anchors are very common for light tasks. They often come with steel screws. Then there are sleeve-type anchors, often called Molly bolts. These are usually metal drywall anchors and offer more strength. The sleeve of the anchor collapses and flares out behind the drywall as the screw is tightened, creating a very strong hold. Self-drilling anchors are a popular choice for their ease of installation, as they combine drilling and anchoring into one step. Finally, toggle bolts and their modern cousins, snap toggle anchors, provide the highest load capacity for drywall by distributing weight over a large area behind the wall. Each type of anchor has its place, and understanding their differences is key to a successful fastening job.
Plastic Fantastic? When Should You Use Plastic Hollow Wall Anchors?
Plastic hollow wall anchors, often the first type of anchor people encounter, are workhorses for many light to medium-duty applications in drywall. These anchors are typically made from nylon or other durable plastic materials and are designed for simplicity and cost-effectiveness. The most common design is the ribbed plastic anchor, which requires you to drill a pilot hole first. You then gently tap the plastic plug into the hole until it’s flush with the wall surface. When you drive a screw into the anchor, the plastic expands, and the ribs bite into the surrounding drywall, creating a secure fit.
These plastic anchors are excellent for hanging items like picture frames, small decorative shelves, lighting fixtures, smoke detectors, and lightweight curtain rods. Their main advantages are their low cost, wide availability, and ease of installation for beginners. However, it’s crucial to understand their limitations. Plastic hollow wall anchors are not designed for heavy items or situations where there will be significant pulling force. Overloading a plastic anchor can cause it to pull out of the drywall, potentially damaging the wall and the item it was holding. Always check the anchor’s weight rating, usually provided on the packaging, and err on the side of caution.
From my experience as a supplier, while plastic anchors serve a valuable purpose, ensuring the quality of the plastic itself is paramount. A brittle or poorly made plastic anchor can snap during installation or fail under a minimal load. We always emphasize using high-grade polymers in our plastic components to ensure reliability. For users like Mark Davis, who prioritize quality, understanding that not all plastic anchors are created equal is important, even for seemingly simple components. The humble Washer often paired with these screws also plays a role in distributing load, and its quality shouldn’t be overlooked.
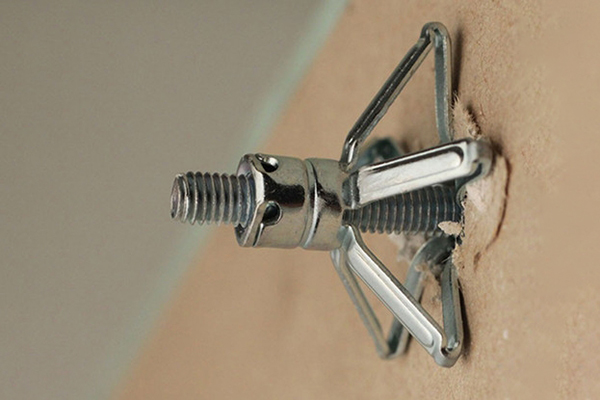
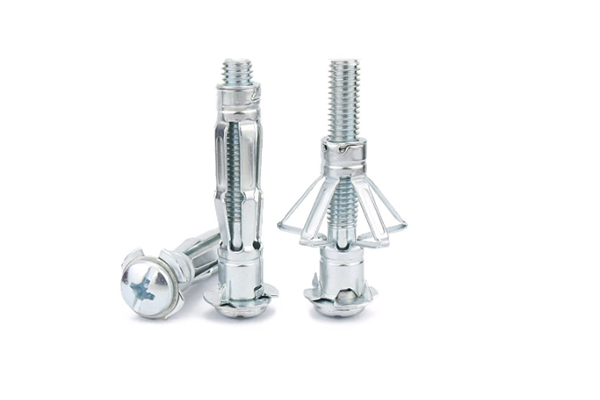
Tackling Heavy Loads: Are Toggle Bolts Your Best Bet for Hollow Walls?
When it comes to hanging heavy items on hollow wall surfaces like drywall or plaster, toggle bolts are often the go-to solution, and for good reason. These anchors are designed to provide superior holding power by distributing the load over a much larger area on the backside of the wall compared to expansion or sleeve anchors. A standard toggle bolt consists of a machine screw and a spring-loaded wing mechanism. To install one, you need to drill a relatively large hole – big enough for the folded wings to pass through.
Once the wings are through the hole and into the wall cavity, they spring open. As you tighten the screw, the wings are drawn flat against the interior surface of the drywall. This creates a very strong and stable anchor point capable of supporting significant weight, such as large mirrors, heavy shelving units, grab bars, or even small wall-mounted cabinets. The larger the toggle wing and the thicker the bolt, the greater the weight it can typically support. It’s this clever design that makes the toggle bolt a champion for heavy-duty fastening in hollow wall scenarios.
However, there are a couple of things to keep in mind with traditional toggle bolts. First, the hole required is often larger than for other anchor types. Second, if you ever need to remove the screw, the wing will fall down inside the wall cavity, meaning you can’t reuse that specific toggle in the same hole without a new wing. Modern variations like snap toggle anchors (e.g., Toggler Snaptoggle) address this by using a plastic strap and a reusable metal toggle channel, offering similar strength with added convenience. For professionals who need reliable solutions for heavy applications, understanding the robust mechanics of a toggle bolt is essential.
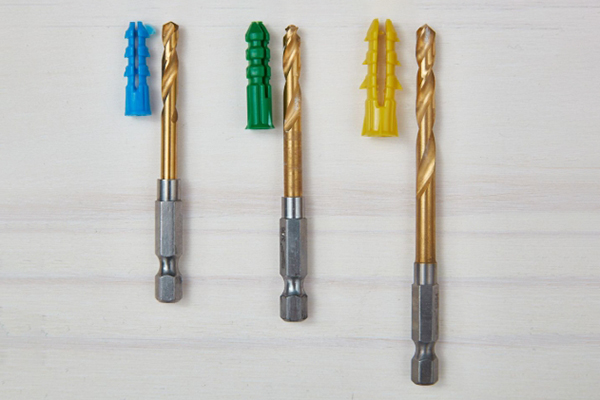
The Self-Drilling Advantage: Do Self-Drilling Anchors Really Save Time and Effort?
Self-drilling drywall anchors, sometimes called threaded anchors or E-Z anchors, have become incredibly popular, especially for those looking to streamline the installation process. As the name suggests, these anchors are designed to drill their own hole directly into drywall without the need for pre-drilling with a separate drill bit. They typically have a sharp, aggressive thread and a pointed tip that cuts through the drywall as you screw them in with a screwdriver or a drill set to a low speed.
The primary advantage of self-drilling anchors is speed and convenience. By eliminating the pre-drilling step, you can significantly reduce the time it takes to install multiple anchors. This is particularly beneficial for projects like hanging a series of pictures, installing storage solutions, or mounting lightweight fixtures. They come in both plastic (usually nylon) and metal (often a zinc alloy) versions. The metal drywall anchors of this type of anchor generally offer a bit more holding power and durability. Once the anchor is screwed flush into the wall, you simply drive your screw into the central hole of the anchor.
While self drilling anchors offer great ease, they are generally best suited for light to medium-duty applications. Their holding power comes from the threads cutting into the drywall, which isn’t as robust as the expansion behind the wall offered by toggle bolts or Molly bolts for truly heavy items. Also, care must be taken during installation not to overtighten them, as this can strip the drywall and compromise the anchor’s grip. In my experience as a manufacturer, the precision of the cutting tip and the quality of the thread are critical for a self-drilling anchor to perform effectively. We focus on these details to ensure our Self-drilling Hollow Anchors, though typically for more robust applications, share this principle of efficient installation.
Choosing Wisely: How Do You Select the Right Size and Type of Anchor for Your Project?
Selecting the correct wall anchor is paramount for a secure and lasting installation. It’s not just about grabbing any anchor; it’s about matching the anchor to the wall material, the weight of the item you’re hanging, and the type of screw you intend to use. Making the wrong choice can lead to a failed fastening, damaged wall, or even injury.
Here are key factors to consider when choosing a wall anchor:
- Wall Material: Is it standard drywall, plaster, concrete, or brick? Most common wall anchors are designed for drywall. Plaster can be more brittle and might require a more delicate approach or a specific type of anchor. Concrete or brick will need masonry anchors.
- Item Weight (Load): This is the most critical factor. Anchors are rated for specific weight limits. Always choose an anchor with a rating well above the actual weight of the item. For heavy items, like large mirrors or cabinets, toggle bolts or heavy-duty sleeve anchors are generally recommended for drywall. For light items like small pictures, plastic expansion anchors or self-drilling anchors are often sufficient.
- Hollow Wall or Solid? If you hit a stud, you generally don’t need a wall anchor; a screw directly into the stud is strongest. For hollow wall sections (the space between studs), you absolutely need an anchor. The depth of the hollow space can also influence your choice, especially for toggle bolts.
- Anchor Diameter and Length: The anchor‘s diameter should be appropriate for the screw size you plan to use, and the hole you drill must match the anchor‘s specified diameter. The length of the anchor (and the screw) must be sufficient to engage properly behind or within the wall material.
- Screw Compatibility: Most anchors are designed to work with specific screw sizes and types (e.g., #6, #8, #10 steel screws). Using the wrong screw can damage the anchor or prevent it from expanding/toggling correctly. Often, anchors are sold with the matching screw.
- Required Holding Power: Beyond just static weight, consider if the item will be subject to any movement or vibration. This might necessitate a more robust anchor.
As a supplier, I always advise customers like Mark Davis to verify the load requirements of their projects and to consult the anchor manufacturer’s specifications. It’s better to over-engineer slightly with a stronger anchor than to risk failure. Remember, the anchor’s listed holding power is often for optimal conditions, so a safety margin is wise.
Step-by-Step: How Do You Correctly Install Different Types of Wall Anchors?
Proper installation is just as important as choosing the right wall anchor. A good anchor installed incorrectly will not perform as expected. While specific instructions can vary slightly by brand and type of anchor, here’s a general guide for installing common drywall anchor types. Always refer to the manufacturer’s instructions included with your specific anchor.
1. Plastic Expansion Anchors (Ribbed/Flanged):
* Mark the spot: Decide where you want to hang your item.
* Drill a pilot hole: Use a drill bit size as recommended by the anchor packaging. The hole should be snug.
* Insert the anchor: Gently tap the plastic anchor (or plug) into the hole with a hammer until it’s flush with the wall. Some have a flange that will sit on the surface.
* Insert the screw: Place your fixture or bracket over the anchor and drive the screw into the anchor until it feels secure. Don’t overtighten, as this can strip the drywall or damage the plastic anchor.
2. Self-Drilling Anchors:
* Mark the spot.
* Install the anchor: Using a Phillips head screwdriver or a drill on a low-speed setting, press the tip of the self-drilling anchor against the drywall and screw it in clockwise until the head of the anchor is flush with the wall.
* Insert the screw: Position your item and drive the appropriate screw into the anchor.
3. Sleeve-Type Anchors (Molly Bolts):
* Mark the spot.
* Drill a pilot hole: Drill a hole to the diameter specified for the Molly bolt.
* Insert the anchor: Lightly tap the anchor into the hole until the flange is flush. Some have small teeth that bite into the drywall to prevent spinning.
* Set the anchor: Turn the screw clockwise. This will cause the sleeve to collapse and flare out behind the drywall. You’ll feel the resistance increase. Once set, you can remove the screw to attach your item, then reinsert the screw. Some Molly bolts have a specialized setting tool.
4. Toggle Bolts:
* Mark the spot.
* Drill a hole: This hole needs to be large enough for the folded toggle wing to pass through.
* Prepare the bolt: Remove the wing from the screw. Insert the screw through your fixture or bracket, then reattach the wing to the screw, ensuring the wings fold towards the screw head.
* Insert the toggle: Pinch the wings together and push them through the hole in the wall. You should hear or feel them spring open inside the cavity.
* Tighten the screw: Pull the screw outwards slightly to ensure the wings are engaged against the back of the wall, then tighten the screw until your item is secure.
Remember, patience and the right tool make all the difference. Using the correct drill bit size is especially crucial for anchors that require pre-drilling.
Common Pitfalls: What Mistakes Should You Avoid When Using Drywall Anchors?
Even with the best intentions, mistakes can happen when installing wall anchors. Avoiding these common pitfalls will save you time, frustration, and potential damage to your drywall wall and the items you’re hanging. As someone who manufactures these components, I’ve seen how small errors can lead to big problems.
Here are some frequent mistakes to watch out for:
- Using the Wrong Type of Anchor for the Load: This is the most common error. A light-duty plastic anchor simply won’t hold a heavy mirror. Always check the weight rating of the anchor and choose one appropriate for the load.
- Drilling the Wrong Size Hole: If the pre-drilling hole is too big, the anchor (especially expansion anchors) won’t get a proper grip and will spin or pull out easily. If it’s too small, you might damage the anchor or the drywall trying to force it in. Always use the drill bit size recommended by the anchor manufacturer.
- Overtightening the Screw: This is especially problematic with plastic anchors and self-drilling anchors in drywall. Overtightening can strip the drywall, causing the anchor to lose its holding power, or even break the anchor itself. Tighten until snug and secure, but don’t overdo it.
- Not Hitting a Stud (When You Should Have): Always use a stud finder first. If there’s a stud conveniently located where you need to mount something heavy, it’s almost always better to drive a screw directly into the stud rather than relying on a drywall anchor next to it. A stud provides the strongest possible support.
- Ignoring Wall Thickness/Condition: Very thin or damaged drywall might not provide enough material for some anchors to grip effectively. For plaster walls, which can be thicker and more brittle, you might need specific anchor types or a more cautious installation approach.
- Reusing Old Holes Incorrectly: If an old anchor has failed or been removed, the hole might be compromised. Simply stuffing a new, same-sized anchor into the old hole might not work. You may need a larger anchor, a repair kit, or a different type of anchor like a toggle bolt that can span the damaged area.
- Poor Quality Anchors: Not all anchors are made equal. Cheaper, low-quality anchors can be made from inferior plastic or weak metal, leading to premature failure. This is a key concern for buyers like Mark Davis, who need reliability. Investing in quality anchors from a reputable supply can prevent headaches down the line. Even basic components like general-purpose Bolts need to meet certain quality standards to perform reliably.
By being mindful of these potential issues, you can ensure your wall anchor installations are successful and secure every time.
Finding a Reliable Supplier: What Should You Look for in an Anchor Manufacturer?
For businesses like the one Mark Davis runs, and for any contractor or large-scale operation, finding a reliable supplier for wall anchors, screws, and other fastening components is crucial. It’s not just about the product itself but the entire supply chain, quality assurance, and service that comes with it. As a factory owner with 7 production lines, I understand these concerns intimately.
When evaluating a potential anchor manufacturer or supplier, consider these points:
- Product Quality and Material Standards: This is non-negotiable. The anchors must be made from high-quality materials (plastic, nylon, metal alloys like zinc or steel) that meet industry specifications. The strength and durability of an anchor depend entirely on this. Ask about their quality control processes. For instance, our Rock Drilling Bits undergo rigorous testing, and we apply similar principles to all our products, including anchors.
- Certifications and Compliance: Look for manufacturers who adhere to international standards, such as ISO certifications. This provides an assurance of quality management and product consistency. For customers like Mark, who are wary of certificate fraud, reputable suppliers will be transparent and provide verifiable documentation.
- Comprehensive Product Range: A good supplier should offer a wide type of anchor selection to cover various applications, from light-duty plastic anchors to heavy-duty toggle bolts and specialized anchors. This allows for one-stop shopping and ensures you can get the right anchor for any job.
- Technical Support and Expertise: Can the supplier offer technical advice? While Mark is knowledgeable in sales, he might lack deep technical expertise. A supplier who can guide on anchor selection for specific applications, explain load ratings, or troubleshoot installation issues is invaluable.
- Reliable Logistics and Lead Times: Shipment delays are a major pain point. A reliable supplier will have robust logistics, provide realistic lead times, and communicate proactively about any potential disruptions. This is vital for keeping projects on schedule.
- Clear Communication and Payment Terms: Efficient communication is key to a smooth B2B relationship. The supplier’s sales representatives should be responsive and knowledgeable. Transparent and fair payment methods are also essential.
- Competitive Pricing (Value for Money): While quality is paramount, pricing must be competitive. The goal is to find a supplier who offers the best value – high-quality products at a fair price. This aligns with Mark’s preference for quality-sensitive yet cost-effective purchasing.
As a manufacturer exporting to the USA, North America, Europe, and Australia, we’ve built our business on these principles. We understand that our B2B clients need more than just a product; they need a reliable partner. By focusing on high-quality materials, efficient production, and customer-centric service, we aim to be that partner.
Key Takeaways for Mastering Wall Anchors
To wrap up our deep dive into the world of wall anchors, here are the most important things to remember:
- Always Use an Anchor in Drywall: Never rely on just a screw in drywall (unless you hit a stud) for anything other than the lightest items. An anchor is essential for holding power.
- Match the Anchor to the Load: The weight of the item you’re hanging is the primary factor in choosing the right type of anchor. Light-duty for pictures, heavy-duty (like toggle bolts) for shelves or cabinets.
- Pre-Drilling is Often Key: For most anchors (except self-drilling types), drilling the correct size pilot hole is crucial for a secure fit.
- Understand Anchor Types: Plastic expansion anchors, sleeve anchors (Molly bolts), self-drilling anchors, and toggle bolts all work differently and have specific applications.
- Don’t Overtighten: Especially with plastic anchors or in drywall, overtightening the screw can strip the material or break the anchor.
- Quality Matters: Choose anchors from reputable sources. The quality of the plastic or metal makes a big difference in strength and reliability.
- Safety First: A properly installed anchor ensures the safety of your belongings and prevents damage to your wall.
- Consult Professionals or Reliable Suppliers: If you’re unsure, especially for heavy or critical installations, seeking advice or sourcing from experienced manufacturers can provide peace of mind and ensure project success.
I hope this guide has been informative and helps you approach your next hanging project with more confidence. Choosing and installing the right wall anchor might seem like a small detail, but it’s a fundamental skill for both DIYers and professionals. At my company, we’re committed to providing not just the anchor itself, but the reliability and strength that stands behind it.
Post time: May-16-2025