


Hello, I’m Allen. For over twenty years, my factory has been producing self-drilling anchor systems and tools for professionals around the globe, from the USA to Australia. I often talk with clients like Mark Davis, a procurement officer who buys our tools for major construction and mining projects. Recently, Mark mentioned a weekend project: he had to dig a trench for a new drainage system in his backyard. It got me thinking. While my company deals with massive excavations, the basic principles of moving earth safely and efficiently are the same. Whether you’re a homeowner with a shovel or a contractor with a fleet of trenchers, understanding the fundamentals is key. This guide will walk you through everything you need to know about trench digging, from planning your dig to choosing the right tools, ensuring you get the job done right.
Why Do You Need to Dig a Trench in the First Place?
Most people don’t just dig a trench for fun. There’s almost always a practical reason behind it. A trench is essentially a long, narrow excavation, and its purpose usually involves burying something or managing water. If you find you need to dig a trench, it’s likely for one of these common projects:
- Installing Utilities: This is a big one. You might need to dig a trench to lay electrical conduit for outdoor lighting, run a water pipe to a garden or outbuilding, or install gas lines for a barbecue grill. These trenches protect the lines from damage and keep your yard looking neat.
- Improving Drainage: Is your lawn constantly soggy? A well-placed trench can solve water problems. You can install a French drain—a perforated pipe surrounded by gravel—to redirect excess water away from your home’s foundation or low spots in your landscape. Proper drainage is crucial for a healthy lawn and a stable home.
- Sprinkler Systems: To get that lush, green lawn, you need an efficient irrigation system. Installing a sprinkler system requires a network of shallow trenches to house the water pipes and sprinkler heads.
- Landscaping and Edging: A shallow trench can create a clean, defined edge between your lawn and a garden bed. You can fill it with materials like stone, brick, or metal edging to create a sharp, professional-looking border that also helps keep mulch in and grass out.
Before You Dig: What’s the Most Crucial First Step?
Before you break ground, hold on! The most important step happens before your shovel ever touches the dirt. It’s all about safety and planning. Hitting an underground utility line is not just an inconvenience; it can be incredibly dangerous and expensive.
“I tell my teams and clients the same thing: planning and safety aren’t just paperwork; they’re the foundation of any successful project, big or small. You can’t undo a mistake once you’ve hit a gas line.” – Allen, Factory Owner
First and foremost, you must find out what’s buried in your yard. In the United States, this is simple and free. Just call 811 or visit their website a few days before you plan to dig. They will contact local utility companies to come to your property and mark the approximate location of any buried lines.
- Red: Electric power lines, cables, conduit, and lighting cables
- Yellow: Gas, oil, steam, petroleum, or gaseous materials
- Orange: Communication, alarm or signal lines, cables, or conduit
- Blue: Potable water
- Green: Sewers and drain lines
Once the utility lines are marked, you can plan your trench path. Mark it out clearly with stakes, string, or spray paint. Now is the time to decide the depth and width you’ll need for your pipe or cable. Planning this ahead of time saves you a lot of work later. Remember to plan a route that avoids major tree roots and, of course, the marked utility lines.
Shovel vs. Trencher: Which Tool Do You Need to Dig Your Trench?
Now for the main event: the actual dig. Your two main options are good old-fashioned muscle power with a shovel or renting a powerful machine called a trencher. The right choice depends on your project’s scale, your budget, and your soil.
Hand digging with a shovel is perfect for smaller jobs. If your trench is short (under 20-30 feet) and not too deep (a foot or so), a shovel is your best bet. It’s cheap, precise, and gives you a good workout. For this, you’ll want more than just a standard garden spade. A trench shovel, also known as a clean-out shovel, has a long, narrow blade designed specifically for digging trenches and clearing out loose soil.
A trencher, on the other hand, is a beast of a machine that makes quick work of long or deep trenches. If you’re digging a trench that’s hundreds of feet long for a sprinkler system or need to go several feet deep, renting a trencher is a smart move. It will save you hours of back-breaking labor.
Here’s a quick comparison to help you decide:
| Feature | Hand Digging (Shovel) | Machine Digging (Trencher) |
|---|---|---|
| Best For | Short, shallow trenches (e.g., landscape edging, short drain) | Long, deep trenches (e.g., irrigation, utility lines) |
| Cost | Low (cost of a shovel) | High (rental fees, fuel) |
| Speed | Slow and laborious | Extremely fast |
| Effort | High physical effort, risk of a blister or two | Low physical effort (but requires strength to operate) |
| Precision | High precision, easy to dig around an obstruction | Less precise, can be bulky |
| Soil Type | Good for soft soil, difficult in rocky soil or clay | Excellent for most soil conditions, even tough ones |
How Do You Dig a Trench by Hand Using a Shovel?
So, you’ve decided to dig a trench by hand. Great! It’s a rewarding task. Here’s how to do it effectively:
- Mark Your Lines: Use two parallel lines to mark the edges of your trench. This ensures you dig a straight and uniform trench.
- Remove the Sod: If you’re digging on your lawn, start by cutting the sod along your marked lines with a flat spade or edger. You can then slide the spade underneath to peel it up. If you keep the sod intact, you can place it back over the trench after you backfill.
- Break Up the Soil: Don’t just start scooping. First, use a pickaxe, mattock, or a sturdy spade to break up the compacted soil along the length of the trench. A grub hoe is also a fantastic hand tool for this, as it allows you to chop into the ground and pull the soil towards you. This initial loosening step makes the rest of the job much easier.
- Start Digging: Once the soil is loose, switch to your trench shovel. Its narrow blade is perfect for scooping out the soil. Dig down a few inches at a time, working your way along the entire trench. This is more efficient than trying to dig one section to its full depth all at once.
- Manage the Soil Pile: As you dig, place the excavated soil on a tarp laid along one side of the trench. This keeps your lawn clean and makes it much easier to backfill the trench later. Keep this soil pile a foot or two away from the edge to prevent it from falling back in.
- Check Your Depth: Use a tape measure frequently to ensure your trench is at a consistent depth. If you’re installing a drainage pipe, you’ll need to create a slight, consistent slope.
For tough spots with rocks or dense roots, a pickaxe or mattock is essential. The pickaxe is for breaking rocks, while the mattock has a broad end (an adze) perfect for chopping through roots.
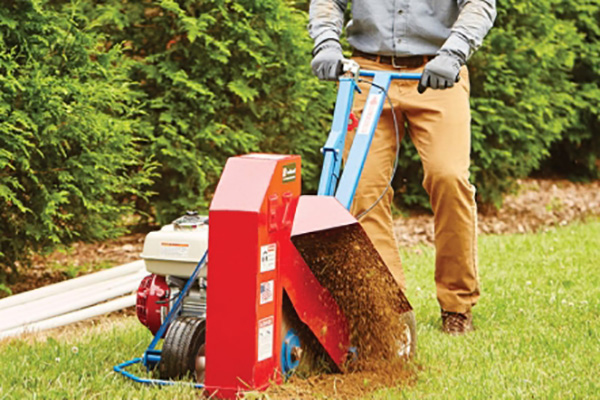
What Should You Know About Renting and Using a Trencher?
If your project is too big for a shovel, it’s time to rent a trencher. These machines can seem intimidating, but they are surprisingly manageable. You can typically rent one from a tool rental center or a place like Home Depot.
There are several types of trenchers, but for a homeowner, the most common are walk-behind trenchers. These are about the size of a large lawnmower and are manually guided. They can typically dig a trench up to 3 feet deep and about 4 to 5 inches wide.
Here are some tips for renting and using a trencher:
- Safety First: Before you even start the engine, read the operator’s manual. Wear sturdy boots, safety glasses, and gloves. These machines have a fast-moving digging chain—keep your hands and feet clear at all times.
- Transport: You’ll likely need a truck or a trailer to get the trencher home, so plan accordingly.
- Operation: Start the trencher on a level surface away from the trench area. Once it’s running, lower the digging boom into the ground slowly. Let the machine do the work; don’t force it. Walk backward slowly, pulling the trencher along your marked path.
- Obstructions: If you hit a large rock or root, the trencher might buck or stall. Stop the machine, raise the boom, and remove the obstruction by hand with a shovel or pickaxe before continuing.
Renting a trencher is ideal for jobs like installing a French drain across a large yard or running a utility line over 100 feet. The cost to rent is well worth the time and effort saved.
How Deep and Wide Should Your Trench Be?
The dimensions of your trench depend entirely on its purpose. There’s no one-size-fits-all answer, but here are some general guidelines:
- Drainage Trenches: A typical French drain trench needs to be about 8 to 12 inches wide to accommodate the drainage pipe and surrounding gravel. The depth varies, but it should be deep enough to create a downward slope. A common rule is to have a slope of 1/8 inch for every 10 feet of run. This ensures gravity pulls the water away. For example, a trench for a French drain might start at 18 inches deep and end up 24 inches deep over 48 feet.
- Electrical Conduit (GFCI protected): For low-voltage wiring (like landscape lighting) or a line protected by a GFCI outlet, a trench depth of 12 inches is often sufficient. The width only needs to be slightly wider than the pipe or conduit.
- Water Pipes: Water pipes should be buried below the frost line to prevent them from freezing and bursting in the winter. The frost line depth varies greatly by climate. In colder regions, you might need to dig a trench that is over 3 feet deep.
- Sprinkler Systems: These trenches are usually quite shallow, typically 6 to 12 inches deep. The main goal is just to get the pipes below the level of any lawn aeration equipment.
Always check your local building codes before you dig, as they will have specific requirements for the depth of any utility trench.
Are There Advanced Tools for Challenging Soil Conditions?
What if your shovel hits something that won’t budge? While a homeowner can often work around an obstruction or use a pickaxe for rocky soil, professionals in construction and mining face these challenges on a much larger scale. When my clients need to dig through solid rock, a simple hand tool won’t do.
They rely on advanced equipment powered by hydraulics and compressed air. For creating holes in rock for blasting or anchoring, they use powerful drills equipped with extremely tough Rock Drilling Bits. These bits are engineered with tungsten carbide buttons that can pulverize rock. The technology is worlds apart from a garden spade, but the underlying principle is the same: applying focused force to break up tough material. Even a handheld tool like a Hammer Hand Drill can provide the percussive action needed for smaller-scale rock excavation, far beyond what a mattock or grub hoe could achieve.
How Do You Ensure Your Trench Walls Are Stable and Safe?
For most shallow backyard trenches (less than 4 feet deep), stability isn’t a major concern, especially in firm soil. However, safety should always be on your mind. A collapsing trench is a serious hazard.
Here are two basic rules for any trench digging project:
- Keep a Setback: As mentioned earlier, keep your excavated soil pile at least two feet away from the edge of the trench. The weight of the soil can cause the trench walls to collapse inward.
- Angle the Walls: In loose or sandy soil, it’s a good idea to slope the side walls of the trench outward. This is called “benching” or “sloping.” Creating a slight V-shape instead of a perfect vertical cut dramatically increases the stability of the trench. An angle of 34 degrees from the vertical is a common safety standard.
In the professional world, digging a trench that is deeper than 4 or 5 feet requires formal safety measures called “shoring” or “shielding.” This involves using large plates or boxes to support the trench walls. For stabilizing the ground in tunnels or major excavations, our clients use sophisticated products like a Self-drilling Hollow Anchor. This tool drills its own hole and can be filled with grout simultaneously, creating an instant rock bolt that supports the surrounding earth. It’s an amazing piece of engineering that keeps workers safe in potentially dangerous environments.
What’s the Right Way to Backfill and Dispose of Excess Soil?
You did it! The pipe is laid, the sprinkler system is installed, and the hard part is over. Now it’s time to put everything back together. Don’t rush this final step.
First, if your project required an inspection, make sure that is completed before you backfill the trench.
The process of backfilling is simple. Use a rake or shovel to move the soil from your tarp back into the trench. It’s best to do this in layers. Add about 6 inches of soil, then tamp it down firmly with your feet or a hand tamper. This prevents the soil from settling too much later on, which would leave a dip in your yard. Repeat this process until the trench is full. The soil will likely mound up above ground level, which is normal. It will settle over the next few weeks.
What about the leftover soil? A buried pipe takes up space, so you’ll always have excess soil. You have a few options to dispose of it:
- Use it to fill low spots elsewhere in your yard or landscape.
- Add it to a compost pile.
- Offer it for free online—gardeners are often looking for fill dirt.
- Spread it thinly over your lawn.
Once the trench is filled, you can replace the sod you carefully saved. Water it well for the next few weeks to help the roots re-establish. Soon, you’ll hardly be able to tell you ever had to dig a trench at all.
Key Takeaways
Digging a trench can be a tough job, but with the right knowledge and tools, it’s a very manageable project. Here are the most important things to remember:
- Plan and Call 811: This is the most critical step. Always locate underground utility lines before you dig.
- Choose the Right Tool: Use a shovel for small jobs and rent a trencher for long or deep trenches to save your back. A proper trench shovel makes a huge difference.
- Dig Safely: Keep the excavated soil away from the edge of the trench, and for deeper trenches, consider sloping the walls.
- Know Your Dimensions: The depth and width of your trench are determined by its purpose and local codes.
- Backfill Correctly: Fill the trench in layers and tamp it down to prevent future settling.
Post time: Jun-16-2025